Pages

Saturday, 9 November 2013

How to Fix "This Copy Of Windows 7 Is Not Genuine" Problem?

11 comments

Often we can notice users asking for 'Windows 7 not genuine error fix'. Anyway, few friends of mine report me that they are facing an annoying "This copy of Windows 7 is not genuine" after using the Windows 7 for few days. Now the reason is pretty obvious, yes they are using Pirated copy of Windows 7. Well, whatever but they are expecting a fix from me as soon as possible. Now this is the time for me to prove myself since I can’t let down my friends expectations. Anyhow if you’re also facing a similar issue on your windows 7, I have an easy guide which will help you to fix 'Windows 7 Not Genuine Error' Read on to know how you can fix it.

Just because we are providing you a solution to "This copy of Windows is not Genuine" problem, it doesn’t mean I'm supporting piracy. I'm solely against piracy and of course, the best way to solve this problem is to buy a genuine copy of windows 7 from market or online store. This solution is only for those who are not in the position of purchasing a brand new copy of Windows 7 at the moment. Now let’s get you into the solution where I have summed up a step by step guide.

Method-1(Using WAT Remover Software):

1. First you need to download WAT Remover software, so download it from Here

2. Now, Run this application. remember that this is an illegal software and your anti-virus will treat it as Potentially Harmful Software, so run this software directly from Zip file or Disable your anti-virus for 1 minute.

3.
Click on  "Remove WAT".

4. Confirm by click on OK when asked 

5. Wait for the process and confirm restart and all done, simple!! 

To confirm that "WAT" is removed, right click on "My Computer" and select "Properties". If the process was successful there will not be any "Windows Activation Status" column as earlier. This method works for all Windows 7 versions (Basic, Premium, Ultimate).

 NOTE: DO NOT update Windows after WAT removal (by default Windows update is set as "Automatic”' change this option to "Never"), as it may reverse the process. 

Method-2(Using CMD without Software):

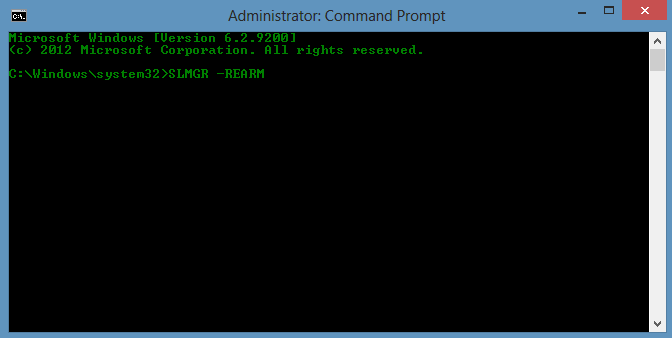
1. First,  you need to open command prompt as Administrator, so open it.

  
2. Now once the command prompt window is opened, type the following command: SLMGR -REARM 
Make sure that you have opened the command prompt using "Run as administrator option" or else this command will not work. See the picture below as reference.
  
 
3. After entering the command as it is, hit the enter button on your keyboard to execute the operation.

4. Right after entering the command a confirmation window will popup stating that "Command completed successfully, please restart the system for the changes to take effect". So follow the instructions and restart the computer so that the changes you have made can take effect.

 
5.
After restarting the computer, you may not receive any "This Copy of Windows Is Not Genuine" error.


So, finally congratulations, you’ve fixed the Windows 7 not genuine error in windows 7.
Now the annoying "This Copy of Windows Is Not Genuine" won’t popup again and again at your taskbar. Anyway, if you’re facing any problem at any step, feel free to ask us through comments below.

Thursday, 24 October 2013

How to Make a System Hidden Folders or Files in Windows Without any Software?

0 comments


Almost anyone knows how to make a “hidden” folder in Windows, but then again almost anyone knows how to make explorer show hidden folders. Let’s take a look at how to make a system hidden folder, only you will know its there.
Anyone that has used Windows for a while knows that they can right-click on a file or folder and edit its properties, more so its attributes to make it a so called "hidden" file or folder. The problem is that just as many people know you can show files and folders that have the "hidden" attribute by simply changing a radio button under the folder view options. The easiest way to make a real hidden file or folder is to mark it as an important operating system file, that way Windows won't display it even if explorer is set to display hidden files and folders.
To do this just follow given steps:
1. First, we need to launch a command prompt, so press the Win + R key
    combination and type cmd then hit the enter button.

2. Now we are going to use the attrib command, so go ahead and type:

  • To make a system hidden folder: attrib +s +h "<address of folder>"
    For example i want to hide a folder "System Folder", and address of this
    folder is C:\System Folder then see below picture:

  • To make a system hidden file: attrib "<address of file>" +s +h
    For example i want to hide a file "System File.txt", and address of this
    file is C:\System Folder\System File.txt then see below picture:

3. Now if I go look for the "System Folder or System File" in my C:\ Drive it is
    gone, even with explorer set to show hidden files and folders.

4. To make visibale hidden file or folder, you can run the same attib command,
    except this time use "-" instead of the "+" signs. see below pictures:
 
To make visible hidden folder
To make visible hidden file
  Like magic, my folder or file appeared again.

If you have any queries or suggestions related to this post on 'How to Make a System Hidden Folders or Files in Windows Without any Software?', you're most welcome in comments..! :) 

Tuesday, 22 October 2013

How To Fix a Blue Screen of Death (BSOD)?

0 comments


A Blue Screen of Death, also called a STOP Error, will appear when an issue is so serious that Windows must stop completely. A Blue Screen of Death is usually hardware or driver related. Most BSODs show a STOP code that can be used to help figure out the root cause of the Blue Screen of Death.

Important: Below are general Blue Screen of Death troubleshooting steps. 

Note: Some of these steps may require you to start Windows in Safe Mode. If that's not possible then skip those steps.
Difficulty: Average
Time Required: It might take you several hours to fix a Blue Screen of Death, depending on the STOP Code.

Here's How:

    1. The most important Blue Screen of Death troubleshooting step you can take
        is to ask yourself what you just did. 
        Did you just install a new program or a piece of hardware, update a driver,
        install an update, etc.? If so, there's a very good chance that the change you
        made caused the BSOD. 
        Undo the change you made and test again for the STOP Error. Depending on
        what change you made, some solutions might include:
    • Startup using Last Known Good Configuration to undo recent registry and driver changes.
    • Use System Restore to undo recent system changes.
    • Roll Back device driver to version prior to your driver update.
    2. Verify that a minimum amount of free space is available on your Windows
        partition. Blue Screens of Death and other serious issues, like data
        corruption, can occur if there's not enough free space on your primary
        partition used for the Windows operating system.
        Note: Microsoft recommends that you maintain at least 100MB of free space
        but I regularly see problems with free space that low. I usually advise
        Windows users to keep at least 15% of a drive's capacity free at all times.
    3. Scan your computer for viruses. Some viruses can cause a Blue Screen of
        Death, especially ones that infect the master boot record (MBR) or boot
        sector.

          Important: Make sure your virus scanning software is completely up to date
        and that it's configured to scan the MBR and boot sector.
    4. Apply all available Windows service packs and other updates. Microsoft
        regularly releases patches and service packs for their operating systems that
        may contain fixes for the cause of your BSOD.
    5. Update drivers for your hardware. Most Blue Screens of Death are hardware
        or driver related so updated drivers could fix the cause of the STOP error.
    6. Check the System and Application logs in Event Viewer (8/ 7/ Vista / XP) for
        errors or warnings that might provide more clues on the cause of the BSOD.
    7. Return hardware settings to default in Device Manager. Unless you have a
        specific reason to do so, the system resources that an individual piece of
        hardware is configured to use in Device Manager should be set to default.
        Non-default hardware settings have been known to cause a Blue Screen of
        Death.
    8. Return BIOS settings to their default levels. An overclocked or misconfigured
        BIOS can cause all sorts of random issues, including BSODs. 
        Note: If you've made several customizations to your BIOS settings and don't
        wish to load the default ones then at least try returning clock speed, voltage
        settings, and BIOS memory options to their default settings and see if that
        fixes the STOP error.
    9. Make sure all internal cables, cards, and other components are installed and
        seated properly. Hardware that's not firmly in place can cause a Blue Screen
        of Death so try reseating the following and then test for the STOP message 
        again:
    • Reseat all internal data and power cables
    • Reseat the memory modules
    • Reseat any expansion cards
    10. Perform diagnostic tests on all hardware you're able to test. It's highly likely
          that the root cause of any given Blue Screen of Death is a failing piece of
          hardware:
    • Test your system memory
    • Test your hard disk drive
              If a test fails, replace the memory or replace the hard drive as soon as
           possible.
    11. Update your BIOS. In some situations, and outdated BIOS could cause a
          Blue Screen of Death due to certain incompatibilities.
    12. Start your PC with essential hardware only. A useful troubleshooting step in
          many situations, including BSOD issues, is to start your computer with the
          minimum hardware necessary to run the operating system. If your
          computer starts successfully it proves that one of the removed hardware
          devices was the cause of the STOP message.

    Tip: Typically, the only necessary hardware for starting your PC through to the operating system includes the motherboard, CPU, RAM, primary hard drive, keyboard, video card, and monitor.

    Tips:

    1. Find that hardware is the cause of your Blue Screen of Death? Try this:

    • Replace the hardware.
    • Update the hardware's firmware.
    • Make sure the hardware is on the Hardware Compatibility List.
    • Check with the manufacturer for support information.

    2. Find that a software program is the cause of your Blue Screen of Death? Try  this:

    • Reinstall the software.
    • Check for and install any available program updates.
    • Check with the developer for support information.
    • Try a competing program.
    If you have any queries or suggestions related to this post on 'How To Fix a Blue Screen of Death (BSOD)?', you're most welcome in comments..! :)

    Saturday, 5 October 2013

    How To Shutdown A Computer By Using Cell Phone?

    10 comments
    The Requirements or Tools for this Tutorial
    1.  One cell phone with GPRS enabled.
    2.  One Email ID
    3.  Microsoft Outlook on the PC to be put to shut down.
    4.  Must have internet connection on your PC.

    Using this method the user can shutdown, restart, hibernate the Computer just
    by sending an email from their cell phone. All you need to have is Microsoft
    outlook which comes with Microsoft word. The Microsoft outlook should be
    installed on the PC you wish to shut down. First you need to create a batch file
    to perform shutdown, restart etc. you can write them down yourself.

    Note: you can complete this trick in every operating system but, here I’m representing this tutorial in “Windows 8 Pro”.
    1.  Open your notepad and type the following:
             c:\windows\system32\shutdown -s - f -t 00
         And save it as shutdown.bat (Executable file)


    2.  Open your Microsoft outlook. Make sure that it is already configured for
        your email id, otherwise configured it here step by step for your email id.
        Note: you can complete this trick on Microsoft Office Outlook (any
        version like 2003, 2007, 2010). Here, I’m doing on MS Office Outlook
        2010.
    (1) After opening Outlook 2010, click on File in upper side left hand corner


    (2) Now, click on “Add Account” and Set up your account detail


    (3) Now, click on “Next”. This auto account setup will configure your email server settings automatically. You can do this manually by selecting manually configure option in last step.


    After this setup, finally click on Finish.

    3. Now we will need to set Microsoft outlook in such a way that outlook checks
       you email every one minute. This can be set by going to “Send/Receive” tab->
       “Send/Receive Group” -> “Define Send/Receive Groups”. After setting this
       click on close button.


    4. Now, This step is to manipulate our computer (MS-Outlook) with Email
        message as for this, we have to set up of rules and alerts on outlook. So,
        again go to-> Tools – Rules and Alerts. Click on E-mail Rules tab. In new
        window select Check messages when they arrive and click Next


    5. Now in next page, check on, on this machine only and with specific words in
        the subject. After checking these two values, click on specific words
        underlined.


    6. Search Text window will open, in the input field type the command that shuts
       down the PC. You can use any commands. For prevention of accidental
       execution I kept %shutdown% as a command. Click on Add button after you
       are done and click on OK.

    7. Now click on Next. In the next window check mark on start application. In the
        lower screen, click on application link.

    8. Now you’ll be welcomed to your familiar file open window. Load all files. And
        select the batch file that you’ve created to shut down your PC.


    9. Click on Next, again click on next (don’t choose any things in this step). And
        finally click on Finish button.

    10. You’ll have %shutdown% alert shown in the E-mail Rules tab.


    11. Now, when you send a message from your phone to your e-mail address
         with the Subject %shutdown% your computer will trigger shutdown.bat file
         and instantly executes the command in that batch file finally leading to shut
         down the PC.
    If you have any queries or suggestions related to this post, you're most welcome in comments..! :)                        

    Saturday, 28 September 2013

    How to Use Your Full Internet Bandwidth Speed?

    2 comments
    We have already discussed "How to Increase Your Browser internet Speed" and "How to make your computer fresh and fast" ,in this article we will see "How to Use Your Full Internet Bandwidth Speed?"
    By Default, Microsoft Windows reserves 20% of bandwidth for it’s own use like Updates etc. This should be undone immediately to optimize or increase your internet speed. To do so you don’t need to install any extra program; you can do this with a simple setting given below step by step.
    1. Press "Windows key + R" (shortcut key for RUN).
    2. Now type gpedit.msc in Run Box and hit Enter. This will give access to Group
        Policy Editor.


    3. Then Navigate to Computer Configuration -> Administrative Templates -> Network -> QOS Packet Scheduler using the pane on the left side.


    4. Now in the right panel you will notice an option called 

       "Limit Reservable Bandwidth". Double click on it or Right click on it and
        choose "Edit" option.

    5. A new window will pop out where you will find Bandwidth Limit is not
       configured by default. 

    6. Now click enabled then you will find Bandwidth Limit is set to 80% by
        default (in Windows 8), so now change Bandwidth Limit to 0 then apply the
        changes.


    7. Hit OK and close the group policy editor. And Restart Your PC.

    Friday, 27 September 2013

    How to Hide a Particular or Specific Drive by Using Command Prompt?

    0 comments
    In my last post I show you that how to hide all the drives together by using registry editing. Now, I will show you that how to hide a Particular or specified drive by using Command Prompt. Now hide any Hard Drive partition without any software. Just follow the simple steps below to hide your particular or specified drive.

    This is the best security tip to be employed against unauthorized users.
    1. Go to Start >> Run >> type "diskpart" (without quotes). A DOS  window will

        appear like this one.


    2. Then type "list volume" (without quotes). The result will look something like
        this one as shown in the picture:


    3. Suppose you want to hide drive D then type "select volume 3" (without quotes). Then a message will appear in same window {Volume 3 is the selected volume}


    4. Now type "remove letter D" (without quotes). Now a message will come
    {DiskPart successfully removed the drive letter or mount point}


    5. All done. Sometime it requires rebooting or just sing out the computer.

    Your Data is now safe from unauthorized users. To access the content of hidden Drive repeat the process mentioned above. But in 4th step replace "remove" by "assign". It means type "assign letter D" in 4th step to unhide drive D.                     


    Enjoy..!

    Thursday, 26 September 2013

    How to Hide all The Drives (C:\, D:\, E:\, ... etc) in Your Computer?

    1 comments
    This is a great trick, you can play on your friends and also will make your privacy high. how to disable the display of Local or networked drives when you click My Computer, see step by step here :-

    1. Go to start->run. Type regedit.

    2. Now go to:

        HKEY_CURRENT_USER\Software\Microsoft\Windows\CurrentVersion

        \Policies\Explorer

    3. Now in the right pane, right click anywhere then click on New then

        Create a new DWORD item and name it NoDrives (it is case sensitive).

        Now modify it's value by right click and set it to 3FFFFFF (Hexadecimal).

    4. Now restart or just sing out your computer. So, now when you click on My
        Computer, no drives will be shown (all Done).

    5. To enable display of drives in My Computer, simply delete this DWORD item
        that you created.
    6. Again restart or just sing out your computer. You can now see all the drives
        again. Magic........lol.... ;)

    Monday, 23 September 2013

    VLC Media Player Fun Trick

    2 comments
    In this tutorial i will share a simple trick yet interesting trick i came across while surfing on the internet. I will call it VLC Inception trick. This trick is simple and works on windows xp, 7 as well as windows 8. If you know this trick then it’s great if you don't then lets dive into it.

    How To Do This Trick?

    Saturday, 21 September 2013

    How to make your computer fresh and fast?

    2 comments


    In this Article I will explain some simple methods to make your computer cleaner and run faster for long period of time. It’s so frustrating to see our computer slowed down after a period of time. So in this article you will get some methods or you can say ways to make your computer run faster. Follow the methods listed below:-

    Remove Useless software and apps: We often install many unnecessary application and later forget to uninstall them These application becomes burden in our computer and eventually slow down our computers So at first you need to delete all this unnecessary application and software To uninstall the software you should go to Control Panel->Add or remove->find and select the software you would like to uninstall. Or shortly press “Windows Key + R” then type control.

    Utilize your RAM performance: A lot of you may have these setting already set, But if you don’t have then don’t worry. You just have to follow the process. Right click on my computer->Properties->Advanced system settings->Setting (Under Performance) ->Advanced->Change (Under Virtual Memory). Now Uncheck automatically manage paging file size for all drives then go on custom size and double the number in Maximum size then the number in initial size. It will surely help your PC to utilize the most of RAM.


    Check for errors: Our computers face errors very oftenly in daily use and some errors stuck to our computer hard disk which makes our computer slow. So it’s very important to kill those errors to make our computer work better. Go to My computer and press enter .Our main hard disk is usually C:\ and we need this drive to be free from error So right click on Hard disk C then click on properties and then click on tools Then from the Error-Checking option click on Check. You may need to restart the computer to do so It will make your computer Faster


    Desktop-cleaning: We often keep unnecessary file in our desktop but it actually affects the performance of our computer. Delete the useless files or another choice is to move them to Local disk if necessary. You should only keep shortcuts in your Desktop only if you needed. If we keep Wallpapers on our desktop it also effect slightly to slow down our computer a blank screen is always better remove temporary internet files and cache from your web browser Browsing internet slow down our computer You need to clean these temporary files and cookies to make your computer stay clean and faster. There are a no. of software available today in the market which can do the task for you. You can use Ccleaner for this purpose which is a very trusted software. To proceed to the official website to download Click here
    Disk Defragmentation: We should defragment our disk to make our PC faster. For defragmentation process, just follow the same steps given below. Locate Hard disk C then click properties then click tools and then click on Optimize from the option Optimize and defragmentation drive.


    Use a Trusted antivirus: the last but not the least tip is to use a reliable trusted antivirus which will protect your PC from harmful antivirus. Kaspersky and AVG are some of the trusted antivirus but you have to pay to use them. If you don’t wish to pay some money then you can also download free Microsoft security essential or free version of Avast or AVG  to save your computer from harmful Malware and spywares. Check the link here
     
    © 2013 Hacker'S Den | Designed by Making Different | Provided by Hacker'S Den | Powered by Hacker'S Den