Pages

Wednesday 4 December 2013

Download Windows 8.1 90-Day Trial Copy

1 comments
It’s been close to few month since Microsoft released Windows 8.1 RTM update to the public. Microsoft’s newest version of Windows operating system, which includes over 50 new exciting features, is an attempt to improve the previously released Windows 8 version and is available as a free upgrade to all Windows 8 users.


Users who have been using Windows 7 and previous versions of Windows might want to test drive the latest offering from the software giant before making the final call. To help all users install and experience Windows 8.1 OS, Microsoft has made available for download a 90-day evaluation copy of Windows 8.1 Enterprise edition.

In addition to all features available in Windows 8 Pro edition, the Enterprise edition include some features designed for business, such as Windows To Go, App Locker, BranchCache, Virtual Desktop Infrastructure and more.

As with Windows 8 and Windows 8 Pro editions, the Enterprise edition is also available in both 32-bit and 64-bit versions. You could either download 32-bit ISO or 64-bit ISO from the download page.


If you plan to install it in a virtual machine or a PC with less than 2GB of RAM, I recommend you download the 32-bit ISO, as the recommended RAM for x64 Windows 8.1 is 2GB and requires more disk space when compared to the 32-bit version.

According to Microsoft, you need at least 20 GB of free space to install 32-bit version of Windows 8.1 and at least 20 GB for 64-bit version too.

To download the 90-day trial copy, head over to link mentioned at the end of this article, select the version of Windows 8.1 (32-bit or 64-bit) that you wish to download, click Get Started Now button, sign-in with your Microsoft account (Hotmail, Live, MSN or Outlook), provide the basic information such as the purpose of downloading the ISO copy & your current Windows version, and then click Continue button to begin downloading the ISO image file.
Once the ISO file is downloaded, you need to prepare a bootable USB or bootable DVD by burning the ISO file.

Download Windows 8.1 From Here

If you have any queries or suggestions related to this post, you're most welcome in comments..! :)

How To Upgrade To Windows 8.1 From Windows 8 For Free?

1 comments
The recently released Windows 8.1 operating system not only ships with new features but also addresses some of the announces of Windows 8 operating system. The ability to skip the Start screen and boot directly to the desktop, the Start button, and better Start screen personalization options are some of the new features of Windows 8.1 update.
              

Although PC users who’re running Windows 7 and previous versions will have to purchase a copy of Windows 8.1, the latest Windows 8.1 is available as a free download to existing Windows 8 users. That is, if your PC is running Windows 8, then your PC is eligible to for the free update and you can upgrade to Windows 8.1 from Windows 8 without losing your files and installed apps.

Here is my quick guide on how to download and install the .1 update on your Windows 8 machine.

NOTE: Even though you can upgrade to Windows 8.1 without losing your files, it’s always a good idea to backup important files.

Step 1: Switch to the Start screen. Click or tap the Store tile to see a large Upgrade to Windows 8.1 for free tile on the home screen of the Store. And if you can’t see the tile, make sure your PC has all recent Windows updates.


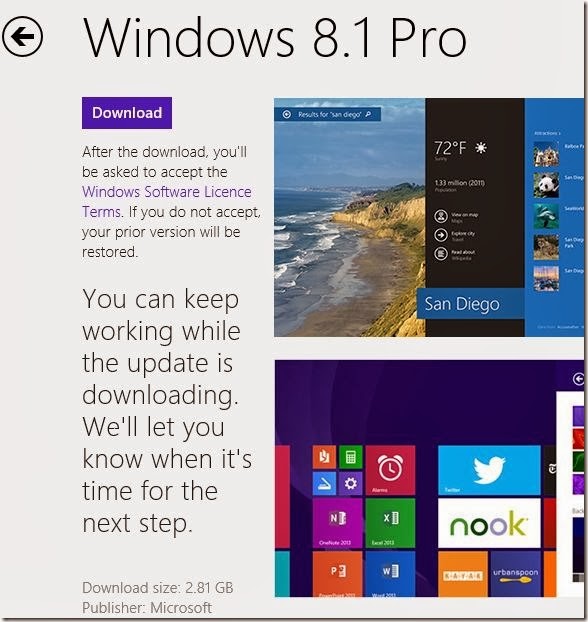
Step 2: Click or tap Upgrade to Windows 8.1 for free tile to see the download button and also size of the download.


Step 3: Click on the Download button to begin downloading the Windows 8.1 update. The time required to download the update varies depending on your version of Windows 8 and the speed of your internet connection.


Note that you can continue using your PC while the update is being downloaded. Once the download is done, Windows will ask you to reboot your PC. Click Restart Now button to reboot the PC and begin installing Windows 8.1 update.


Your PC will restart twice or thrice during this install process.

Step 4: Once setup completes the installation, you’ll be presented with the license terms screen where you need to click I accept button to continue.


Step 5: Next, you’ll see Settings screen. Here, click Use express settings button to go with the recommended settings. 

And if you don’t want to go with the recommended settings and change default settings, click Customize button to turn on or off above mentioned features and options.

Step 6: In the following screen, you’ll be asked to enter your Microsoft account ID and password. If you were using Microsoft account in Windows 8 as well, you’ll be asked to enter the password for your Microsoft account.


And if you don’t want to sign in with your Microsoft account, you can create a local account also.

When you see Help us to protect your info screen, select your email address or the contact number that you had entered while creating your Microsoft account and then click Next button to receive a secret code from Microsoft that you have to enter in the box to verify the account.


Or, you can simply click I can’t do this right now option to skip this step and proceed to the next one. You can verify the account later using the option provided in PC settings.

Step 7: Next, when you see the SkyDrive screen, click Next button.


You’ll have to wait for a couple of minutes while Windows completes install process. Once done, you’ll see the Start screen. That’s it!


If you have any queries or suggestions related to this post, you're most welcome in comments..! :)

Saturday 9 November 2013

How to Fix "This Copy Of Windows 7 Is Not Genuine" Problem?

11 comments

Often we can notice users asking for 'Windows 7 not genuine error fix'. Anyway, few friends of mine report me that they are facing an annoying "This copy of Windows 7 is not genuine" after using the Windows 7 for few days. Now the reason is pretty obvious, yes they are using Pirated copy of Windows 7. Well, whatever but they are expecting a fix from me as soon as possible. Now this is the time for me to prove myself since I can’t let down my friends expectations. Anyhow if you’re also facing a similar issue on your windows 7, I have an easy guide which will help you to fix 'Windows 7 Not Genuine Error' Read on to know how you can fix it.

Just because we are providing you a solution to "This copy of Windows is not Genuine" problem, it doesn’t mean I'm supporting piracy. I'm solely against piracy and of course, the best way to solve this problem is to buy a genuine copy of windows 7 from market or online store. This solution is only for those who are not in the position of purchasing a brand new copy of Windows 7 at the moment. Now let’s get you into the solution where I have summed up a step by step guide.

Method-1(Using WAT Remover Software):

1. First you need to download WAT Remover software, so download it from Here

2. Now, Run this application. remember that this is an illegal software and your anti-virus will treat it as Potentially Harmful Software, so run this software directly from Zip file or Disable your anti-virus for 1 minute.

3.
Click on  "Remove WAT".

4. Confirm by click on OK when asked 

5. Wait for the process and confirm restart and all done, simple!! 

To confirm that "WAT" is removed, right click on "My Computer" and select "Properties". If the process was successful there will not be any "Windows Activation Status" column as earlier. This method works for all Windows 7 versions (Basic, Premium, Ultimate).

 NOTE: DO NOT update Windows after WAT removal (by default Windows update is set as "Automatic”' change this option to "Never"), as it may reverse the process. 

Method-2(Using CMD without Software):

1. First,  you need to open command prompt as Administrator, so open it.

  
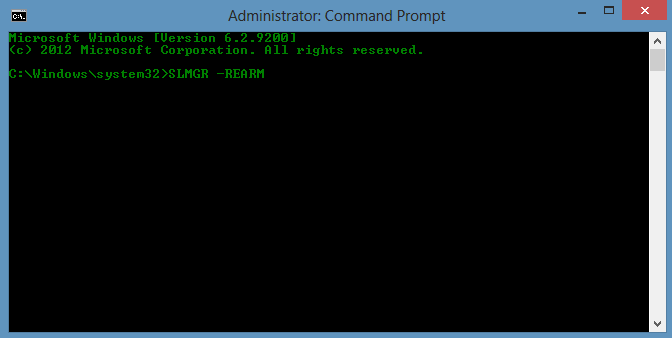
2. Now once the command prompt window is opened, type the following command: SLMGR -REARM 
Make sure that you have opened the command prompt using "Run as administrator option" or else this command will not work. See the picture below as reference.
  
 
3. After entering the command as it is, hit the enter button on your keyboard to execute the operation.

4. Right after entering the command a confirmation window will popup stating that "Command completed successfully, please restart the system for the changes to take effect". So follow the instructions and restart the computer so that the changes you have made can take effect.

 
5.
After restarting the computer, you may not receive any "This Copy of Windows Is Not Genuine" error.


So, finally congratulations, you’ve fixed the Windows 7 not genuine error in windows 7.
Now the annoying "This Copy of Windows Is Not Genuine" won’t popup again and again at your taskbar. Anyway, if you’re facing any problem at any step, feel free to ask us through comments below.

Thursday 7 November 2013

How to CUT Off Someone Internet Access For Test Or For Fun Or For Increase Your Bandwidth Or Speed Up Internet?

21 comments

Hello guys, today I'm going to introduce two very small software but very very powerful networking software Netcut and Netcut Defender. Most important thing is that these are totally freeware software. No cost for using these.

What Is NetCut?
Netcut stands for Network Cut. NetCut is a software where we can control the connection to each computer/laptop in a WIFI network/LAN. However, this software can be used to retrieve internet bandwidth from other computers in a LAN/WIFI.

Hacking The Internet Connection of the shared computers in Colleges/ Cyber Cafe / schools etc. and gain the complete Access of internet with full speed.

What can You Do with NetCut?
Netcut is a network admin tool for network administrator to exam network speed/probe address inventory/manage bandwidth/check brand/change MAC address. That is one short answer.
You can do --
1. In less than 1 Minute, Find any IP/Computer/network devices/Phon
    /Xbox/PSP/PS3/Wii/Ipad anything that use your network.

2. Protect your PC away from ARP SPOOF attack.

3. Change MAC address on any adapter on your PC.

4. Clone MAC address from any device of your network to your own PC's adapter 

5. Turn any of network device on/offline?

6.  Test your internet speed and more....

How It Will Work On Wifi?


Shared connection speed is basically determined the number of users connected, topology is used, setting protocols and much more.. If using a pure setting, the access speed will be divided based on the number of users who use it.. example : If the connection speed = 500 Kbps, and there are 5 users who use it, then the speed of each to 100 Kbps, except given the limit connection to other user .. So more and more users connected, the smaller also access. And Using This attack Cut the internet connection of shared computers in LAN/WIFI. and Get the Full Speed of internet on your system.

How To Get the Full Speed of Internet On Your System?
Just follow below given steps :
Step 1:- First, you will need the NetCut software so Download it from Here
Step 2:- After downloaded Software and install it On Your System.
Step 3:- Open The Software and you will Get the following screen.


 Step 4:- After this, click on "Choice Netcard", then you will get following screen

Here, you will get all network adapet of your system, so choose your Network adapter, which is connected.
Note : only choose connected network adapter, don't choose any disconnected adapter. here in my case, i have only one network adapter, which is connected. but in your case, maybe you have one or more network adapter, so don't be confused in selecting network adapter.

Step 5:- After doing this, you will get following screen 
 Now, Select all or any One of the IP Addresses Seen On The Screen EXCEPT the first two IP because They are Your PC's and Router's IP Address. After Selecting the IP address Press the Cut Off(Ready) Button and the internet connection Will Be Cut Off Within few Seconds.

Step 6:- To Resume or Start The Internet again Press the Resume Button and the internet Will again start working In the shared computers.

All You have done!!!!
   
Now After Cutting The network connection Lets Study The Prevention from This attack so that this cannot happen with you.
NetCut Defender : This software can protect you when you surf the Internet using wireless networks in particular hotspot areas which may be used by the net users. By using NetCut Defender, then guaranteed you will be protected from ignorant people who use netCut to control bandwidth, LAN and Wireless network. Why NetCut Defender? No internet disconnection any more, Starts with operating system , you don’t have to run every time turning on your PC. Lists all open ports in your connection (Security wise), Get your public IP address, Know who is cutting your connection, Direct link to internet connection speed meter, Direct link to spyware scanner, Direct link to free virus scanner and No Spyware

Step 1:- Download the NetCut Defender form Here.
Step 2:- After downloaded Software and install it On Your System
Step 3:- There Will Be an Icon in the system tray of NetCut Defender, like this.
Step 4:- To see, who is attacking on your system, right click on this icon, then select "Who Cut Me" from Options.
Step 5:- After this, you will get a complete list of attackers in new window. Here Attackers List window is blank because no one is trying to cut my internet.
Now, You have all done!!!

If you have any queries or suggestions related to this post on 'How to CUT Off Someone Internet Access For Test Or For Fun Or For Increase Your Bandwidth Or Speed Up Internet?', you're most welcome in comments..! :)  

Sunday 3 November 2013

A-Z Index of the Bash command line for Linux

5 comments

A
  alias    Create an alias •
  apropos  Search Help manual pages (man -k)
  apt-get  Search for and install software packages (Debian/Ubuntu)
  aptitude Search for and install software packages (Debian/Ubuntu)
  aspell   Spell Checker
  awk      Find and Replace text, database sort/validate/index


B
  basename Strip directory and suffix from filenames
  bash     GNU Bourne-Again SHell
  bc       Arbitrary precision calculator language
  bg       Send to background
  break    Exit from a loop •
  builtin  Run a shell builtin
  bzip2    Compress or decompress named file(s)


C
  cal      Display a calendar
  case     Conditionally perform a command
  cat      Concatenate and print (display) the content of files
  cd       Change Directory
  cfdisk   Partition table manipulator for Linux
  chgrp    Change group ownership
  chmod    Change access permissions
  chown    Change file owner and group
  chroot   Run a command with a different root directory
  chkconfig System services (runlevel)
  cksum    Print CRC checksum and byte counts
  clear    Clear terminal screen
  cmp      Compare two files
  comm     Compare two sorted files line by line
  command  Run a command - ignoring shell functions •
  continue Resume the next iteration of a loop •
  cp       Copy one or more files to another location
  cron     Daemon to execute scheduled commands
  crontab  Schedule a command to run at a later time
  csplit   Split a file into context-determined pieces
  cut      Divide a file into several parts


D
  date     Display or change the date & time
  dc       Desk Calculator
  dd       Convert and copy a file, write disk headers, boot records
  ddrescue Data recovery tool
  declare  Declare variables and give them attributes •
  df       Display free disk space
  diff     Display the differences between two files
  diff3    Show differences among three files
  dig      DNS lookup
  dir      Briefly list directory contents
  dircolors Colour setup for `ls'
  dirname  Convert a full pathname to just a path
  dirs     Display list of remembered directories
  dmesg    Print kernel & driver messages
  du       Estimate file space usage


E
  echo     Display message on screen •
  egrep    Search file(s) for lines that match an extended expression
  eject    Eject removable media
  enable   Enable and disable builtin shell commands •
  env      Environment variables
  ethtool  Ethernet card settings
  eval     Evaluate several commands/arguments
  exec     Execute a command
  exit     Exit the shell
  expect   Automate arbitrary applications accessed over a terminal
  expand   Convert tabs to spaces
  export   Set an environment variable
  expr     Evaluate expressions


F
  false    Do nothing, unsuccessfully
  fdformat Low-level format a floppy disk
  fdisk    Partition table manipulator for Linux
  fg       Send job to foreground
  fgrep    Search file(s) for lines that match a fixed string
  file     Determine file type
  find     Search for files that meet a desired criteria
  fmt      Reformat paragraph text
  fold     Wrap text to fit a specified width.
  for      Expand words, and execute commands
  format   Format disks or tapes
  free     Display memory usage
  fsck     File system consistency check and repair
  ftp      File Transfer Protocol
  function Define Function Macros
  fuser    Identify/kill the process that is accessing a file


G
  gawk     Find and Replace text within file(s)
  getopts  Parse positional parameters
  grep     Search file(s) for lines that match a given pattern
  groupadd Add a user security group
  groupdel Delete a group
  groupmod Modify a group
  groups   Print group names a user is in
  gzip     Compress or decompress named file(s)


H
  hash     Remember the full pathname of a name argument
  head     Output the first part of file(s)
  help     Display help for a built-in command •
  history  Command History
  hostname Print or set system name

I
  iconv    Convert the character set of a file
  id       Print user and group id's
  if       Conditionally perform a command
  ifconfig Configure a network interface
  ifdown   Stop a network interface
  ifup     Start a network interface up
  import   Capture an X server screen and save the image to file
  install  Copy files and set attributes


J
  jobs     List active jobs •
  join     Join lines on a common field


K
  kill     Stop a process from running
  killall  Kill processes by name


I
  less     Display output one screen at a time
  let      Perform arithmetic on shell variables •
  link     Create a link to a file
  ln       Create a symbolic link to a file
  local    Create variables •
  locate   Find files
  logname  Print current login name
  logout   Exit a login shell •
  look     Display lines beginning with a given string
  lpc      Line printer control program
  lpr      Off line print
  lprint   Print a file
  lprintd  Abort a print job
  lprintq  List the print queue
  lprm     Remove jobs from the print queue
  ls       List information about file(s)
  lsof     List open files


M
  make     Recompile a group of programs
  man      Help manual
  mkdir    Create new folder(s)
  mkfifo   Make FIFOs (named pipes)
  mkisofs  Create an hybrid ISO9660/JOLIET/HFS filesystem
  mknod    Make block or character special files
  more     Display output one screen at a time
  mount    Mount a file system
  mtools   Manipulate MS-DOS files
  mtr      Network diagnostics (traceroute/ping)
  mv       Move or rename files or directories
  mmv      Mass Move and rename (files)


N
  netstat  Networking information
  nice     Set the priority of a command or job
  nl       Number lines and write files
  nohup    Run a command immune to hangups
  notify-send  Send desktop notifications
  nslookup Query Internet name servers interactively


O
  open     Open a file in its default application
  op       Operator access


P
  passwd   Modify a user password
  paste    Merge lines of files
  pathchk  Check file name portability
  ping     Test a network connection
  pkill    Stop processes from running
  popd     Restore the previous value of the current directory
  pr       Prepare files for printing
  printcap Printer capability database
  printenv Print environment variables
  printf   Format and print data •
  ps       Process status
  pushd    Save and then change the current directory
  pwd      Print Working Directory


Q
  quota    Display disk usage and limits
  quotacheck Scan a file system for disk usage
  quotactl Set disk quotas


R
  ram      ram disk device
  rcp      Copy files between two machines
  read     Read a line from standard input •
  readarray Read from stdin into an array variable •
  readonly Mark variables/functions as readonly
  reboot   Reboot the system
  rename   Rename files
  renice   Alter priority of running processes
  remsync  Synchronize remote files via email
  return   Exit a shell function
  rev      Reverse lines of a file
  rm       Remove files
  rmdir    Remove folder(s)
  rsync    Remote file copy (Synchronize file trees)


S
  screen   Multiplex terminal, run remote shells via ssh
  scp      Secure copy (remote file copy)
  sdiff    Merge two files interactively
  sed      Stream Editor
  select   Accept keyboard input
  seq      Print numeric sequences
  set      Manipulate shell variables and functions
  sftp     Secure File Transfer Program
  shift    Shift positional parameters
  shopt    Shell Options
  shutdown Shutdown or restart linux
  sleep    Delay for a specified time
  slocate  Find files
  sort     Sort text files
  source   Run commands from a file '.'
  split    Split a file into fixed-size pieces
  ssh      Secure Shell client (remote login program)
  strace   Trace system calls and signals
  su       Substitute user identity
  sudo     Execute a command as another user
  sum      Print a checksum for a file
  suspend  Suspend execution of this shell •
  sync     Synchronize data on disk with memory


T
  tail     Output the last part of file
  tar      Tape ARchiver
  tee      Redirect output to multiple files
  test     Evaluate a conditional expression
  time     Measure Program running time
  timeout  Run a command with a time limit
  times    User and system times
  touch    Change file timestamps
  top      List processes running on the system
  traceroute Trace Route to Host
  trap     Run a command when a signal is set(bourne)
  tr       Translate, squeeze, and/or delete characters
  true     Do nothing, successfully
  tsort    Topological sort
  tty      Print filename of terminal on stdin
  type     Describe a command •


U
  ulimit   Limit user resources •
  umask    Users file creation mask
  umount   Unmount a device
  unalias  Remove an alias •
  uname    Print system information
  unexpand Convert spaces to tabs
  uniq     Uniquify files
  units    Convert units from one scale to another
  unset    Remove variable or function names
  unshar   Unpack shell archive scripts
  until    Execute commands (until error)
  uptime   Show uptime
  useradd  Create new user account
  userdel  Delete a user account
  usermod  Modify user account
  users    List users currently logged in
  uuencode Encode a binary file
  uudecode Decode a file created by uuencode


V
  v        Verbosely list directory contents (`ls -l -b')
  vdir     Verbosely list directory contents (`ls -l -b')
  vi       Text Editor
  vmstat   Report virtual memory statistics


W
  wait     Wait for a process to complete •
  watch    Execute/display a program periodically
  wc       Print byte, word, and line counts
  whereis  Search the user's $path, man pages and source files for a program
  which    Search the user's $path for a program file
  while    Execute commands
  who      Print all usernames currently logged in
  whoami   Print the current user id and name (`id -un')
  wget     Retrieve web pages or files via HTTP, HTTPS or FTP
  write    Send a message to another user

  
X
  xargs    Execute utility, passing constructed argument list(s)
  xdg-open Open a file or URL in the user's preferred application.
  yes      Print a string until interrupted
  .        Run a command script in the current shell
  !!       Run the last command again
  ###      Comment / Remark

Saturday 2 November 2013

How To Get 200+ Likes On Your Facebook Page Or Earn Money Online Daily?

10 comments
First You Need To Signup At PaidCoin

What is Paidcoin??
Paidcoin is free social exchange network which helps you grow your social presence.
>>> After login into your account. You have to earn free points by liking other
        pages,posts, photos or by sharing.

>>> you will get 8 points for each like.

>>> When you have enough points say 500 points. Then select Add site/page
        at the top left corner.
>>> Fill the form according to your requirements.

>>> At the end of the form there is an option CPC(cost per click). The minimum
        value is 2. So set it to 2.

>>> Select Save changes.

That's it. You will get likes as long as you have points in your account. When your coins will finish. just simply earn more free points.


The main benefit of this is that you can get 4 likes on your page for each of your like on other pages. As you earn 8 points for liking other pages and spend 2 points to get a like on your page.


Note : You Can Also Change Your Points to Money (1000 points = 1$) Enjoy
           Earning :D

Friday 25 October 2013

How to Make Bootable Pendrive Without any Software?

4 comments

Have you ever wanted to install an Operating System(OS), but didn't have the time or didn't know how? Here's an easy and fast way of doing so. When installing an OS, use a USB. It is a much faster way than using a CD/DVD. Follow given below steps:

STEPS:

1. Insert your USB into your computer. When your computer finally recognizes
    it, open the command prompt(Run as Administrator).

2. Once inside the command prompt, type: diskpart , then press Enter.

     After that, You will something like this one:

3. Now, type: list disk , All active drives will be displayed to the command
    prompt:
  • After that, you will want to select your USB. Typically, it's always the   smallest one in size, so you will always be able to tell which one your USB. Now, type: select disk 1
  • After that, Clean your USB. Be sure to back up all data stored on the USB you are using, because you will lose all your data in this step. Type: clean

 
4. Now, you will create a partition for the USB. Type: create partition primary


5. Type: select partition 1 . This will select the partition you have just created.

  • Now, type: active . This will make the partition active on the USB.
     
6.  Now, Type: format fs=ntfs . This command will format your USB in NTFS file
     system. This could take awhile time depending on the size of the drive and
     the processing power of your computer. It could take time from a few
     seconds to 15 minutes.
  • Once completed, type: assign .
7. Congratulations, now you have a bootable USB. Type: exit


8. Now, Insert your Windows DVD or mount ISO image in the optical drive and
    note down the drive letter of the optical drive and USB media. Here I'm using
    "H" as my optical (DVD) drive letter and "J" as my USB drive letter.
  • Go back to command prompt and type following commands: H: and hit enter. Where "H" is your DVD drive letter.
  • Now, type: cd boot and hit enter.
  • After that type BOOTSECT.EXE/NT60 J: and hit enter. (Where "J" is your USB drive letter.
9. Once you have done that, Open the DVD from windows explorer
   (My Computer). You might have to right-click on it, then click on "Open".
   select all that you see and transfer to your USB.


10. That's all. Now, you have a bootable Pendrive with Win 8 or any.

If you have any queries or suggestions related to this post on 'How to Make
Bootable Pendrive Without any Software?', you're most welcome in comments..! :)  
 
© 2013 Hacker'S Den | Designed by Making Different | Provided by Hacker'S Den | Powered by Hacker'S Den